
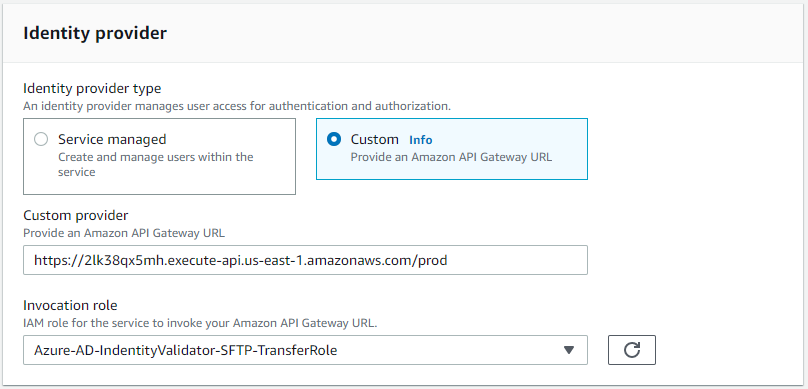
AWS Transfer for SFTP enables you to easily move your file transfer workloads that use the Secure Shell File Transfer Protocol (SFTP) to AWS without needing to modify your applications or manage any SFTP servers. Out of the box you can easily allow for certificate based authentication, however tying into another validation mechanism can be a bit cumbersome. AWS SFTP now supports custom identity providers, however it us up to you to create the backend logic for authentication and policy creation.
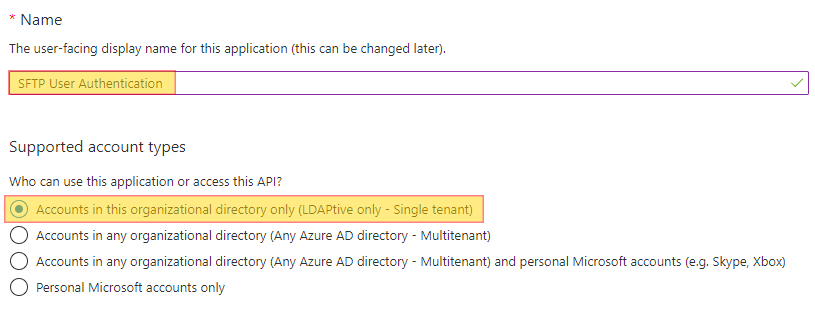
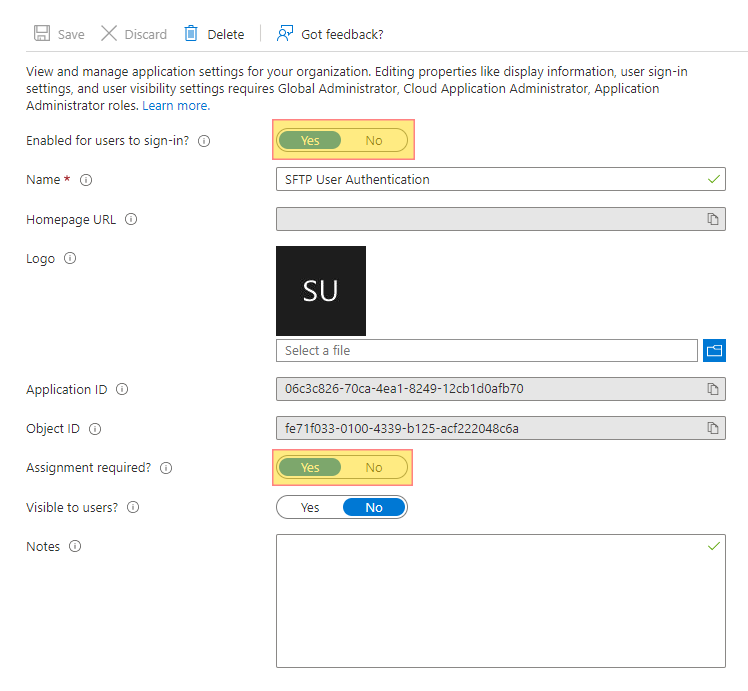
We are going to use AWS Transfer for SFTP with a custom authentication configured to allow uploading to S3 via SFTP using Azure Active Directory credentials. In order for the user to gain access and use this service, the user will be required to have access rights on the Azure AD application. We will further break down some working scenarios specifying access rights depending on group membership.
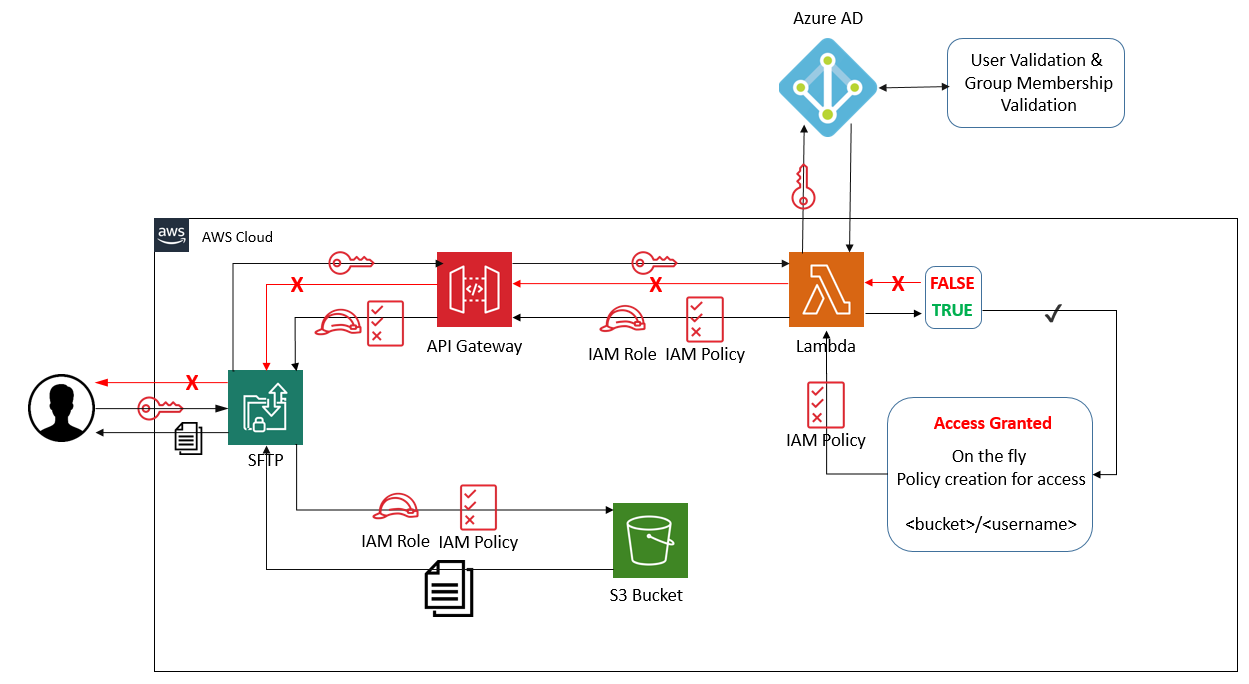
We have the following steps involved:

{
    "Version": "2012-10-17",
    "Statement": [
        {
            "Sid": "ListBuckets",
            "Effect": "Allow",
            "Action": [
                "s3:ListAllMyBuckets",
                "s3:GetBucketLocation"
            ],
            "Resource": "*"
        },
        {
            "Sid": "ListSftpBucket",
            "Effect": "Allow",
            "Action": [
                "s3:ListBucket"
            ],
            "Resource": [
                "arn:aws:s3:::MY_BUCKET_NAME"
            ]
        },
        {
            "Sid": "AllowFtpWriteOptions",
            "Effect": "Allow",
            "Action": [
                "s3:PutObject",
                "s3:GetObject",
                "s3:DeleteObjectVersion",
                "s3:DeleteObject",
                "s3:GetObjectVersion"
            ],
            "Resource": [
                "arn:aws:s3:::MY_BUCKET_NAME/*/*"
            ]
        }
    ]
}
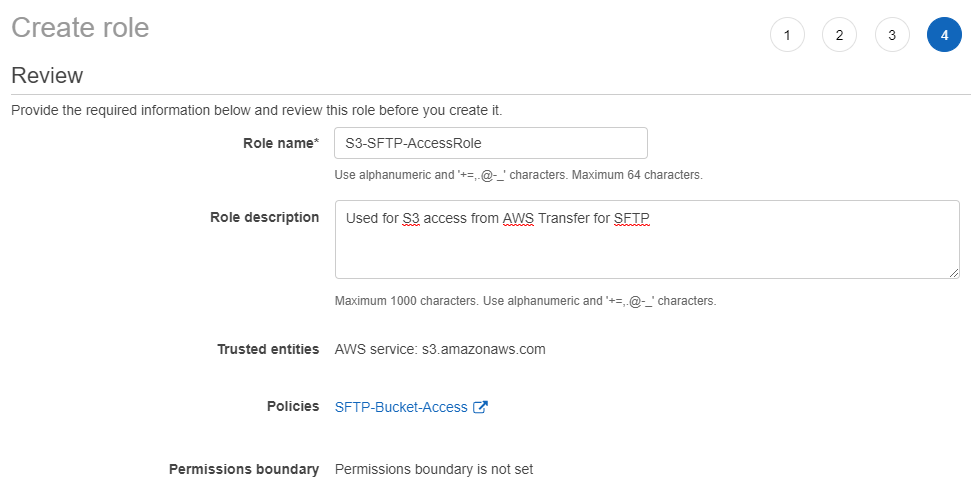
{
  "Version": "2012-10-17",
  "Statement": [
    {
      "Effect": "Allow",
      "Principal": {
        "Service": "transfer.amazonaws.com"
      },
      "Action": "sts:AssumeRole"
    }
  ]
}
and select Update Trust Policy.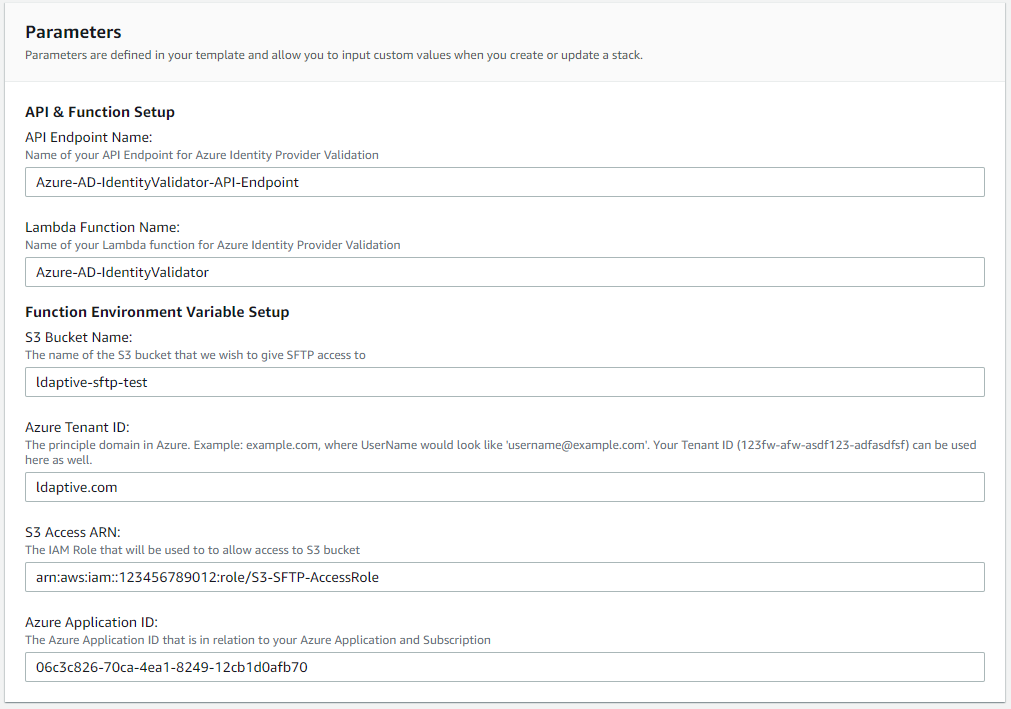
const AWS = require('aws-sdk');
const https = require('https');
const queryString = require('querystring');

/**
 * @param {object} event            event passed from sftp server
 * @param {string} event.username   username of sftp user
 * @param {string} event.password   password of sftp user
 * @returns                         access response
 */
exports.handler = async (event) => {
    const tenantId = await decryptVariable(process.env.tenantId);
    const clientId = await decryptVariable(process.env.AzureClientId);
    const bucket = await decryptVariable(process.env.bucket);
    const s3Role = await decryptVariable(process.env.S3RoleArn);

    //if using tenantId (the guid id) set this to your domain name example: mydomain.com
    const domain = tenantId;

    var userName = event.username;

    if (userName.includes('%40')) {
        userName = decodeURIComponent(userName);
    } else {
        userName = `${userName}@${domain}`;
    };

    var credentials = {
        client_id: clientId,
        response_type: 'token',
        scope: 'https://graph.microsoft.com/User.Read',
        grant_type: 'password',
        username: userName,
        password: event.password
    };

    var postData = queryString.stringify(credentials);
    var options = {
        method: 'POST',
        host: 'login.microsoftonline.com',
        path: `/${tenantId}/oauth2/v2.0/token`,
        headers: {
            "Accept": "application/json",
            "Content-Type": "application/x-www-form-urlencoded",
            "Content-Length": postData.length
        }
    };

    var token = await webRequest(options, postData);

    if (!token.access_token) {
        if (token.error) {
            console.log({ status: 'Failure', user: userName, error: token.error, errorUri: token.error_uri });
        };
        return {};
    } else {
        console.log({ status: 'Success', user: userName, scope: token.scope });

        /**
         * Add Additional login here!
         */

        var response = {
            Role: s3Role,
            HomeBucket: bucket,
            HomeDirectory: "/" + bucket + '/' + userName.toLowerCase(),
            Policy: JSON.stringify(scopedPolicy)
        };
        return response;
    };
};

/**
 * @param {object} options          https options
 * @param {string} options.host     https domain or root url
 * @param {string} options.path     https url endpoint to hit
 * @param {string} options.port     https port to use - defaults to 443
 * @param {string} options.method   https method POST | GET | PUT | DELETE
 * @param {object} options.headers  Header data that needs to be passed the call
 * @param {object} postData         data that should be sent in a post body
 * @returns
 */
var webRequest = (options, postData) => new Promise((resolve) => {
    const req = https.request(options, res => {
        var chunk = '';
        res.on('data', d => {
            chunk += d
        }).on('end', () => {
            var response = JSON.parse(chunk.toString());
            response.statusCode = res.statusCode;
            resolve(response);
        });
    });
    req.on('error', error => {
        console.error('error', error);
    });
    if (postData) { req.write(postData); };
    req.end();
});

/**
 * @param {string} variable         environment variable encrypted by KMS
 * @returns                         decrypted variable
 */
var decryptVariable = (variable) => new Promise((resolve) => {
    if (!variable.startsWith('AQICA')) { return resolve(variable) };
    var aws = new AWS.KMS().decrypt({
        CiphertextBlob: Buffer.from(variable, 'base64'),
        EncryptionContext: { LambdaFunctionName: process.env.AWS_LAMBDA_FUNCTION_NAME }
    });
    aws.on('success', r => {
        resolve(r.data.Plaintext.toString('ascii'));
    }).on('error', e => {
        console.log('error decrypting key', e.message);
    }).send();
});

// this is our scoped policy that will determine the access rights of the user
var scopedPolicy = {
    Version: "2012-10-17",
    Statement: [
        {
            Sid: "allowFolderList",
            Action: [
                "s3:ListBucket"
            ],
            Effect: "Allow",
            Resource: [
                "arn:aws:s3:::${transfer:HomeBucket}"
            ],
            Condition: {
                StringLike: {
                    "s3:prefix": [
                        "${transfer:UserName}/*"
                    ]
                }
            }
        },
        {
            Sid: "allowListBuckets",
            Effect: "Allow",
            Action: [
                "s3:ListAllMyBuckets",
                "s3:GetBucketLocation"
            ],
            Resource: "*"
        },
        {
            Sid: "HomeDirectoryAccess",
            Effect: "Allow",
            Action: [
                "s3:PutObject",
                "s3:GetObject",
                "s3:DeleteObjectVersion",
                "s3:DeleteObject",
                "s3:GetObjectVersion"
            ],
            Resource: [
                "arn:aws:s3:::${transfer:HomeDirectory}/*"
            ]
        },
        {
            Sid: "DenyDeletionOfHomeDirectory",
            Effect: "Deny",
            Action: [
                "s3:DeleteObjectVersion",
                "s3:DeleteObject"
            ],
            Resource: [
                "arn:aws:s3:::${transfer:HomeDirectory}/"
            ]
        }
    ]
};
const AWS = require('aws-sdk');
const https = require('https');
const queryString = require('querystring');
/**
 * @param {object} event            event passed from sftp server
 * @param {string} event.username   username of sftp user
 * @param {string} event.password   password of sftp user
 * @returns                         access response
 */
exports.handler = async (event) => {
    const tenantId = await decryptVariable(process.env.tenantId);
    const clientId = await decryptVariable(process.env.AzureClientId);
    const bucket = await decryptVariable(process.env.bucket);
    const s3Role = await decryptVariable(process.env.S3RoleArn);

    //if using tenantId (the guid id) set this to your domain name example: mydomain.com
    const domain = tenantId;

    var userName = event.username;

    if (userName.includes('%40')) {
        userName = decodeURIComponent(userName);
    } else {
        userName = `${userName}@${domain}`;
    };

    var credentials = {
        client_id: clientId,
        response_type: 'token',
        scope: 'https://graph.microsoft.com/User.Read',
        grant_type: 'password',
        username: userName,
        password: event.password
    };

    var postData = queryString.stringify(credentials);
    var options = {
        method: 'POST',
        host: 'login.microsoftonline.com',
        path: `/${tenantId}/oauth2/v2.0/token`,
        headers: {
            "Accept": "application/json",
            "Content-Type": "application/x-www-form-urlencoded",
            "Content-Length": postData.length
        }
    };

    var token = await webRequest(options, postData);

    if (!token.access_token) {
        if (token.error) {
            console.log({ status: 'Failure', user: userName, error: token.error, errorUri: token.error_uri });
        };
        return {};
    } else {
        console.log({ status: 'Success', user: userName, scope: token.scope });

        /**
         * Add Additional logic here if required
         */

        var response = {
            Role: s3Role,
            HomeBucket: bucket,
            HomeDirectory: "/" + bucket + '/' + event.username.toLowerCase(),
            Policy: JSON.stringify(scopedPolicy)
        };
        return response;
    };
};
............
} else {
    console.log({status: 'Success', user: userName, scope: token.scope});

    var options = {
        method: 'GET',
        host: 'graph.microsoft.com',
        path: `/v1.0/me?$select=department`,
        headers: {
            "Accept": "application/json",
            "Authorization": `Bearer ${token.access_token}`
        }
    };

    var userInfo = await webRequest(options);

    var response = {
        Role: s3Role,
        HomeBucket: bucket,
        HomeDirectory: "/" + bucket + '/' + userInfo.department.toLowerCase(),
        Policy: JSON.stringify(scopedPolicy)
    };
    return response;
};
.............
............
} else {
    console.log({status: 'Success', user: userName, scope: token.scope});

    var groupId = "fc069ccd-e570-4648-b826-705ac1b230fe";
    var groupSearch = encodeURIComponent(`id eq '${groupId}'`);

    var options = {
        method: 'GET',
        host: 'graph.microsoft.com',
        path: `/v1.0/me/memberof?$filter=${groupSearch}`,
        headers: {
            "Accept": "application/json",
            "Authorization": `Bearer ${token.access_token}`
        }
    };

    var homeDirectory = "/" + bucket + '/' + userName.toLowerCase()
    var userInfo = await webRequest(options);

    if(userInfo.statusCode === 200){
        homeDirectory = "/" + bucket + '/my_group_membership_folder'
    } else {
        //not member of group no change
    }

    var response = {
        Role: s3Role,
        HomeBucket: bucket,
        HomeDirectory: homeDirectory,
        Policy: JSON.stringify(scopedPolicy)
    };
    return response;
};
.............
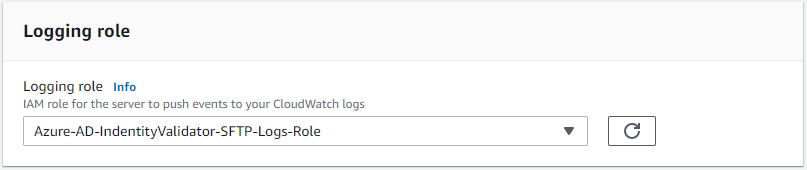
This is just an example on how to setup authentication with Azure AD and leverage group membership validation. There are many different use cases, weather leveraging Read Only or Write access, or being able to better direct who has access to what files. Our use case for creating this dealt with several hundred users needing to be able to access data specific to them and provisioning local access keys was not a viable solution nor did it pass rigorous audit checks due to the nature of the data. We also gained insight into what a user is doing what with data by logging all file access to cloudwatch and thus not requiring a separate CloudTrail for this bucket.
An added benefit with this version, access to objects in Azure AD are limited to the user profile. With our previous version it required having read only to the entire directory in order to understand who is a member of what group. Not having any external library dependance allows for smaller code footprint and less chance of security vulnerability creep or braking changes.
The source code for this function as well as other examples can be accessed via our github repo at the following location: https://github.com/ldaptive/aws-s3-sftp-azure-IdentityProvider-V2
Are you curious as to what type of data Intelligent Discovery collects in relation to AWS vulnerabilities?
Login into our on-line demo to see a simulated view of what Intelligent Discovery collects and explains how to remediate.
demo.intelligentdiscovery.io
LDAPTIVE, LLC 2018 © All Rights Reserved. Privacy Policy | Terms of Service